Weinstein, MD, FACS
Call Us Today
908-879-2222
385 Route 24 Chester, New Jersey.
Corner of Route 24 and
Chester Woods Dr.
Chester Woods Professional Park
Menu
[x] Close
Home
About Us
Dr. Larry Weinstein Plastic Surgeon
Kryptonite isn’t Brooklynite
Awards & Honors
Chester Office Tour
Chester Ambulatory Surgery Center
NY/NJ Metro Location
Patient Information
Insurance Information
Patient Forms
Seminars
Financing Plastic Surgery
About Us
Plastic Surgery Blog
FAQs
Surgical Procedures
Facial Plastic Surgery Procedures
Natural Facelift (Rhytidectomy)
Jowl Lift New Jersey
Neck Lift New Jersey
Brow Lift (Forehead Lift)
Z-LIFT Facelift
Eye tuck (Blepharoplasty)
Rhinoplasty (Nose Surgery)
Ear Reshaping (Otoplasty)
Breast Procedures
Breast Augmentation
Breast Lift
Breast Reduction
Breast Reconstruction
Male Breast Reduction New Jersey
Body Procedures
Arm Liposuction
Brachioplasty
Buttock And Outer-Thigh Lifts
Hand Surgery
Liposuction (Liposuction)
Tummy Tuck (Abdominoplasty)
Scar Revision
Tissue Expansion
Mommy Makeover
Male Procedures
Male Breast Reduction New Jersey
Male Face Procedures
Non-Surgical Procedures
Facial Rejuvenation Procedures
Fillers (Liquid Facelift)
Radiesse
Restylane
Juvederm
Botox
VECTRA 3D Imaging
Laser Skin Rejuvenation
Laser Hair Removal
Laser Tattoo Removal
Laser Skin Rejuvenation
Before & After Photos
Before & After Photos
Videos
Reviews
Patient Testimonials
RealSelf Patient Reviews
News & Media
News & Media
Blog
Special Offers
Charity Work
Plastic Surgery Articles
Plastic Surgery Statistics
Podcasts
Contact Us
Contact Us
Consultation Information
Schedule Evaluation
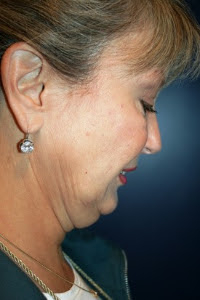
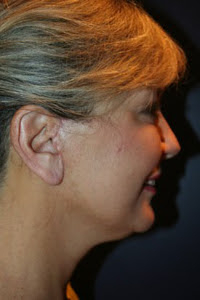
Z-Lift Patient 20716
Before
After
layout:
Request A Consultation
First and Last Name
*
Email
*
Phone
*
Message
Message
* Required field
Δ
Request a Consultation
Specials & Promotions
Patient Financing
Patient Testimonials
Newsletter Signup Form
Charity Work
Office Hours
Monday
: 9am-6:30pm
Thursday
: 9am-5:30pm
To make an appointment 9-5 everyday.
Please email us for an appointment 24/7 or call our office and leave a message for our staff that will be returned the next business day.
Phone:
908-879-2222
Holiday Hours
Closed: Labor Day
Closed: Memorial Day